DARWINBOX - HRMS Help Document
Custom Roster Configuration & API Integration Setup
A complete, step-by-step reference for configuring employee data points in Darwinbox and connecting Darwinbox Studio to an external HRMS integration platform
About This Guide
This document is a comprehensive help guide for administrators working with Darwinbox HRMS. It is split into two parts, in the order you will actually use them:
Part I — API Integration Setup: the prerequisite steps. How to create a Studio user and generate the API key and dataset credentials that Darwinbox Studio requires before any external system (such as Tartan) can securely sync employee data with your Darwinbox instance.
Part II — Custom Roster Configuration: how to create a Custom Roster in Darwinbox and add the specific employee data points (fields) your organization needs to see in it, such as banking details, statutory identifiers, contact information, or joining details, and how to bulk-populate values for those fields. This builds on the access set up in Part I.
Darwinbox Studio is the admin panel used to manage API users, API keys, and datasets that power integrations between Darwinbox and third-party HRMS or payroll platforms. Part I of this guide walks through generating the five credentials — username, password, hrms_host, api_key, and dataset_key — that such an integration requires.
A Custom Roster is a configurable report available under Platform → Reporting & Analytics → Custom Roster. It lets an administrator build a tailored table of employee information by picking exactly which columns should appear, who the report should cover, and how sensitive it should be treated. Common uses include payroll input sheets, bank advice rosters, statutory compliance reports, and management dashboards.
This guide is written for HR administrators and platform admins who have access to the Settings and Studio areas of Darwinbox.
Note The screens in this guide use illustrative names such as “Sample Employee Roster,” “Your Company Name,” and demo user profiles like “James O Niell.” Your own Darwinbox environment will show your organization’s real names instead. The steps and layout are otherwise identical. |
Table of Contents
Part I — API Integration Setup (Darwinbox Studio)
1. Overview & Prerequisites
2. Required Parameters
3. Logging in to Darwinbox Studio
4. Creating an API (Studio) User
5. Generating the API Key
6. Creating an Employee Roster Dataset
7. Confirming Your HRMS Host
8. Integration Tips & Security Notes
Part II — Custom Roster Configuration
9. Accessing the Custom Roster Page
10. Creating a New Roster
11. Adding Data Points to the Roster
12. NPS Fields Activation
13. Saving the Roster
14. Tips & Best Practices
15. Questions for HR
PART I
API Integration Setup (Darwinbox Studio)
The prerequisite steps: how to retrieve the credentials Darwinbox Studio generates so an external HRMS integration, such as Tartan, can securely establish HRMS integration.
1. Overview & Prerequisites
This part of the guide walks through retrieving the credentials required to connect an external system to your Darwinbox instance for automated employee data sync. These credentials are generated from Darwinbox Studio, a separate admin panel from the main Settings area used in Part II. Complete this part first: the Custom Roster work in Part II assumes the access set up here is already in place.
Before you begin, make sure you have:
Admin access to Darwinbox Studio
The API Access module enabled by Darwinbox support (if it is not yet enabled, raise a request with your Darwinbox account manager or support team)
Internet access to your HRMS instance, e.g. https://yourcompany.darwinbox.in/
2. Required Parameters
By the end of this part of the guide, you will have collected five values. Your integration partner (e.g. Tartan) will ask for these by the exact names below:
Field | What it means |
|---|---|
username | The API user ID provided or generated in Darwinbox Studio (Section 4). |
password | The password set for that API user (Section 4). |
hrms_host | Your Darwinbox host URL, without any path or trailing slash (Section 7). |
api_key | The master API key generated in Studio (Section 5). |
dataset_key | The key identifying the specific employee dataset created for the integration (Section 6). |
Note Keep a secure record of each value as you generate it in the steps below — several of these, especially the API key, are shown only once and cannot be retrieved again after you navigate away.
| |
3. Logging in to Darwinbox Studio
Step 1: Visit your Darwinbox Studio admin URL: https://yourcompany.darwinbox.in/studio — or open Admin Apps from your Darwinbox home page and select Darwinbox Studio.
Step 2: Log in with your admin credentials.
4. Creating an API (Studio) User
Step 3: Open the Studio User tab in Darwinbox Studio's top navigation. This lists every Studio user already created, along with their User ID, type, and creation date.
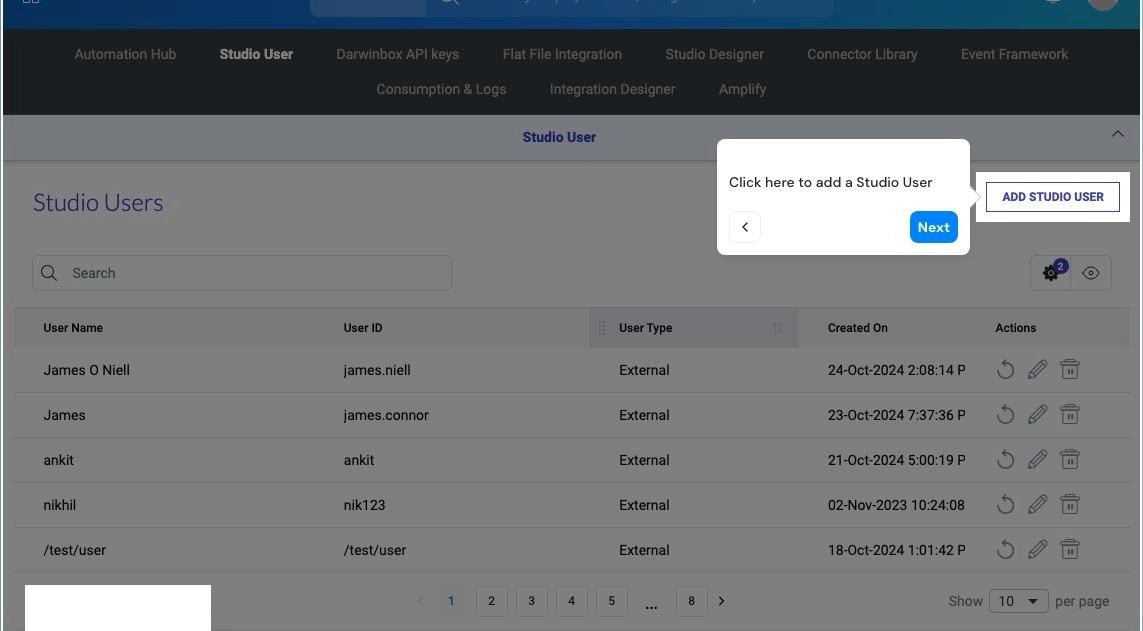
Figure 1 — The Studio User list, with “ADD STUDIO USER” in the top-right corner.
Step 4: Click “ADD STUDIO USER” to open the new-user form.
Fill in the following fields:
User Name — the person or system this access is for, e.g. a descriptive name for your integration.
Type — typically External for a third-party integration such as Tartan.
Email — the admin or integration team's email address.
User ID — a logical, identifiable ID, e.g. tartan-api-user. This becomes the username parameter.
Password — set and confirm a password. This becomes the password parameter your integration partner will need.
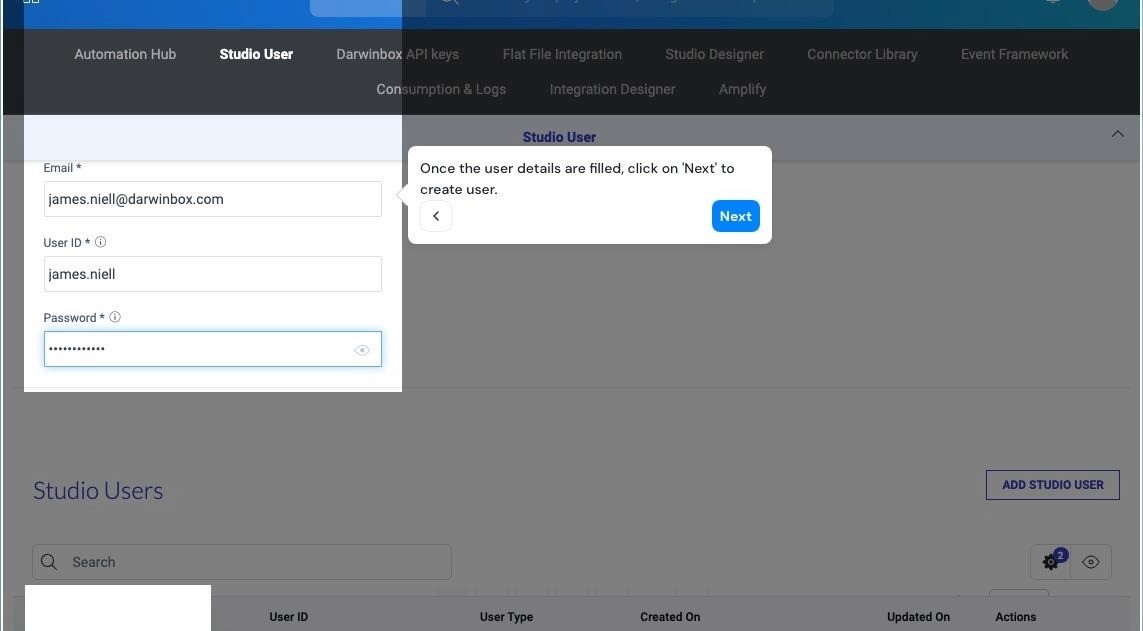
Figure 2 — The Add Studio User form with Email, User ID, and Password filled in.
Step 5: Click “Create.” The new user is saved and appears at the top of the Studio Users list.
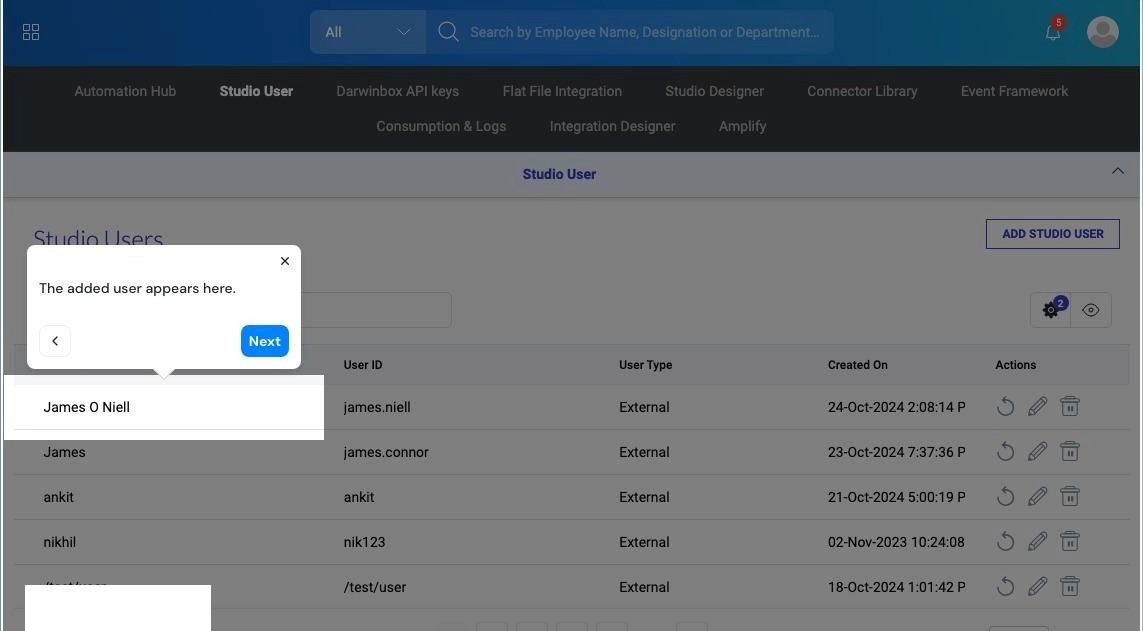
Figure 3 — The newly created user appearing in the Studio Users list.
Note The exact field names shown here (User Name, Type, User ID, Password) are what current Darwinbox Studio displays. Older documentation may refer to the same flow as Settings → API Management → “Add New User” with Username / Email / Role fields — the underlying username and password parameters are equivalent. |
5. Generating the API Key
Step 6: Open the Darwinbox API keys tab in Studio's top navigation. This lists every API configuration already created, showing its Configuration Name, linked User, Module, and API Endpoint.
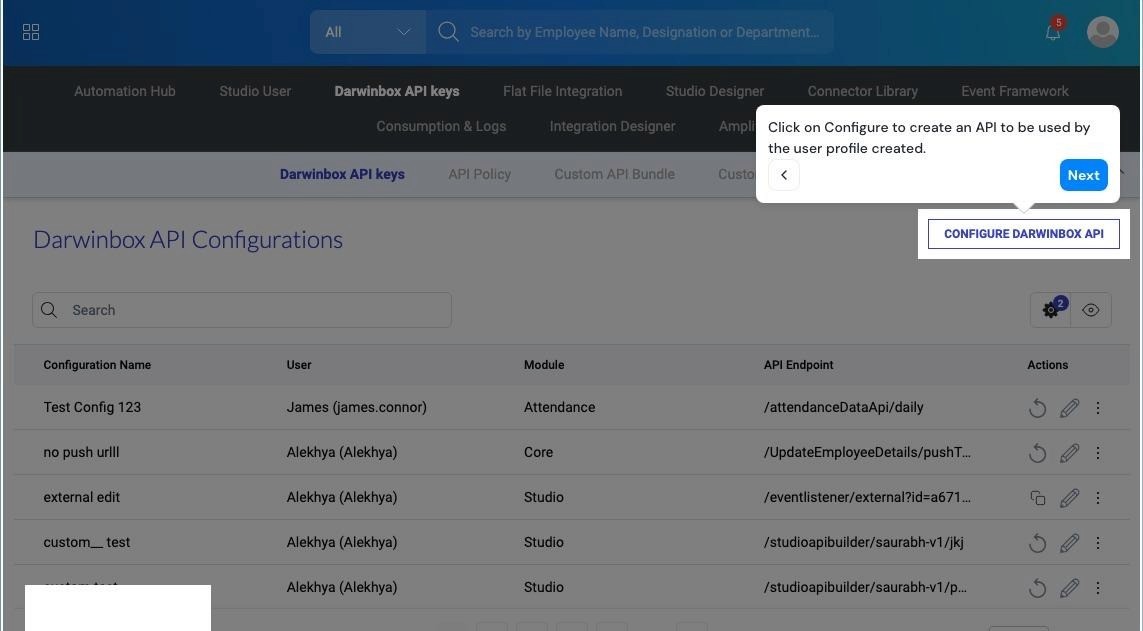
Figure 4 — The Darwinbox API Configurations list, with “CONFIGURE DARWINBOX API” in the top-right corner.
Step 7: Click “CONFIGURE DARWINBOX API” to open the key configuration form.
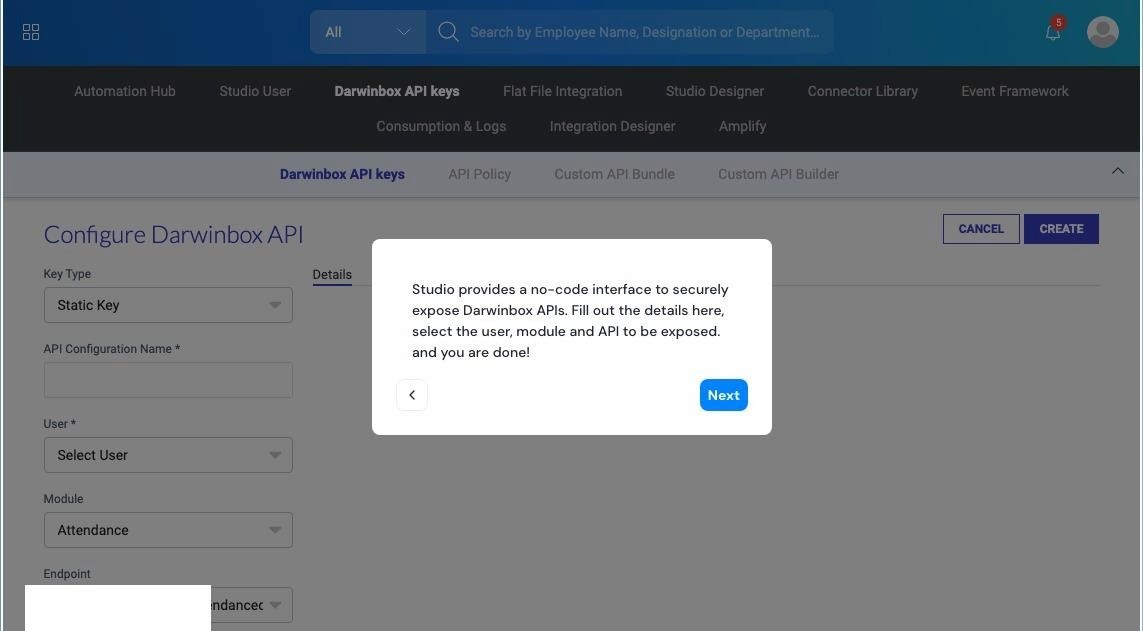
Figure 5 — The Configure Darwinbox API form: Key Type, API Configuration Name, User, Module, and Endpoint.
Fill in the following fields:
Key Type — typically Static Key for a standard server-to-server integration.
API Configuration Name — a descriptive name, e.g. Tartan-Employee-Sync, so this key is easy to identify later.
User — select the Studio user you created in Section 4. This links the key's permissions to that user's access.
Module — the data area the integration needs i.e. Core (Employee Master).
Endpoint — the specific API to expose, e.g. an employee master endpoint. Darwinbox Studio also shows Sample payload, Sample Response, and Code Snippet tabs alongside the Details tab to help you and your integration partner confirm the exact request/response shape.

Figure 6 — The form filled in, with the API key linked to the Studio user created earlier.
Step 8: Click “CREATE.” The configuration is saved and appears at the top of the Darwinbox API Configurations list.
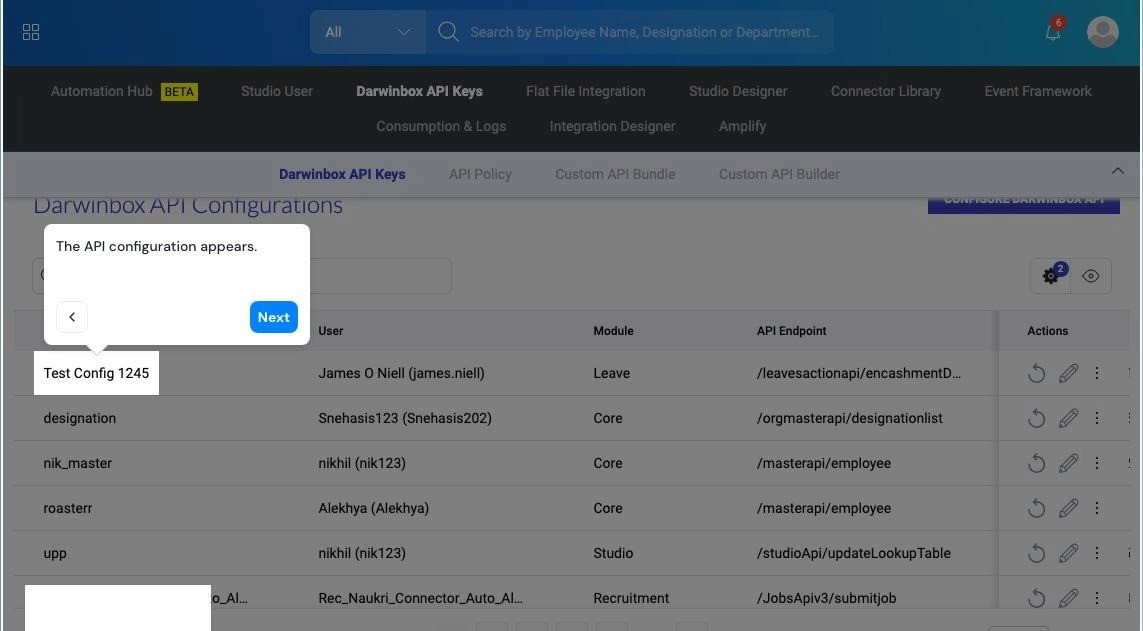
Figure 7 — The new API configuration appearing in the list, linked to its Studio user.
Important Depending on the Key Type, the generated api_key or secret may be shown only once at creation time. Copy and store it securely right away — if it is lost, you will need to create a new configuration. |
6. Creating an Employee Roster Dataset
To give the integration granular, controlled access to employee data — rather than the entire Employee Master table — create a dedicated dataset:
Step 9: Navigate to Studio → Datasets → Create Dataset.
Step 10: Name the dataset, e.g. Tartan Employee Roster.
Step 11: Choose the Employee Master table as the primary data source.
Step 12: Add the fields the integration needs, for example:
Full Name (first_name + last_name)
Corporate Email ID (company_email_id)
Employee ID (employee_id)
Personal Email ID (personal_email_id)
Mobile (office_mobile_no or personal_mobile_no)
Date of Joining (DOJ) (date_of_joining)
PAN Number (PAN Number)
Employee Status (employee_status)
Bank Details
Dependent Details
Etc.
Step 13: Save and publish the dataset.
Step 14: Copy the Dataset Key from the dataset summary screen — this is the dataset_key value.
This key gives the integration secure, scoped access to only the fields you selected, rather than the full employee record.
7. Confirming Your HRMS Host
Your hrms_host value is typically your Darwinbox instance URL, with no trailing slash and no additional path: yourcompany.darwinbox.in
Do not include /studio, a trailing slash (/), or any other path segment in this value.
8. Mandatory Integration Tips
Ensure that a Read-only scope for the API user and dataset / api keys are enabled. If you’re not able to perform this action — contact your Darwinbox support representative or raise a query through the Darwinbox Help Portal to have it turned ON.
If the API Access module or Darwinbox Studio is not visible to you, it has not yet been enabled for your account — contact your Darwinbox support representative or raise a query through the Darwinbox Help Portal.
Revisit the dataset in Studio → Datasets whenever your Custom Roster in Part II gains new data points that also need to sync through the integration, and add the corresponding fields there.
If the employee active and inactive data lies in two different endpoints, then ensure that two dataset and api keys are generated, one for active and another for active. Both of them can be entered while creating the connection.
Ensure that the field which has actual data / value in it is selected in the Custom Roster. For e.g. PAN is stored in the PAN Number field however there is another field for PAN Number (verified) where values are null / empty, then the PAN Number field should be enabled in the Custom Roster which consists of actual pan number values.
There might be a possibility of some restrictions in sharing confidential information like pan, aadhaar, bank details, etc. if so - contact your Darwinbox support representative or raise a query through the Darwinbox Help Portal.
PART II
Custom Roster Configuration
How to create a Custom Roster, add the employee data points your organization needs, and populate values for them.
9. Accessing the Custom Roster Page
Step 1: Log in to Darwinbox and go to Platform → Reporting & Analytics → Custom Roster.
This page lists every custom roster that has already been created for your organization, along with its name, an auto-generated roster code, and action icons to edit or delete it. If none exist yet, the table will show “No data available.”
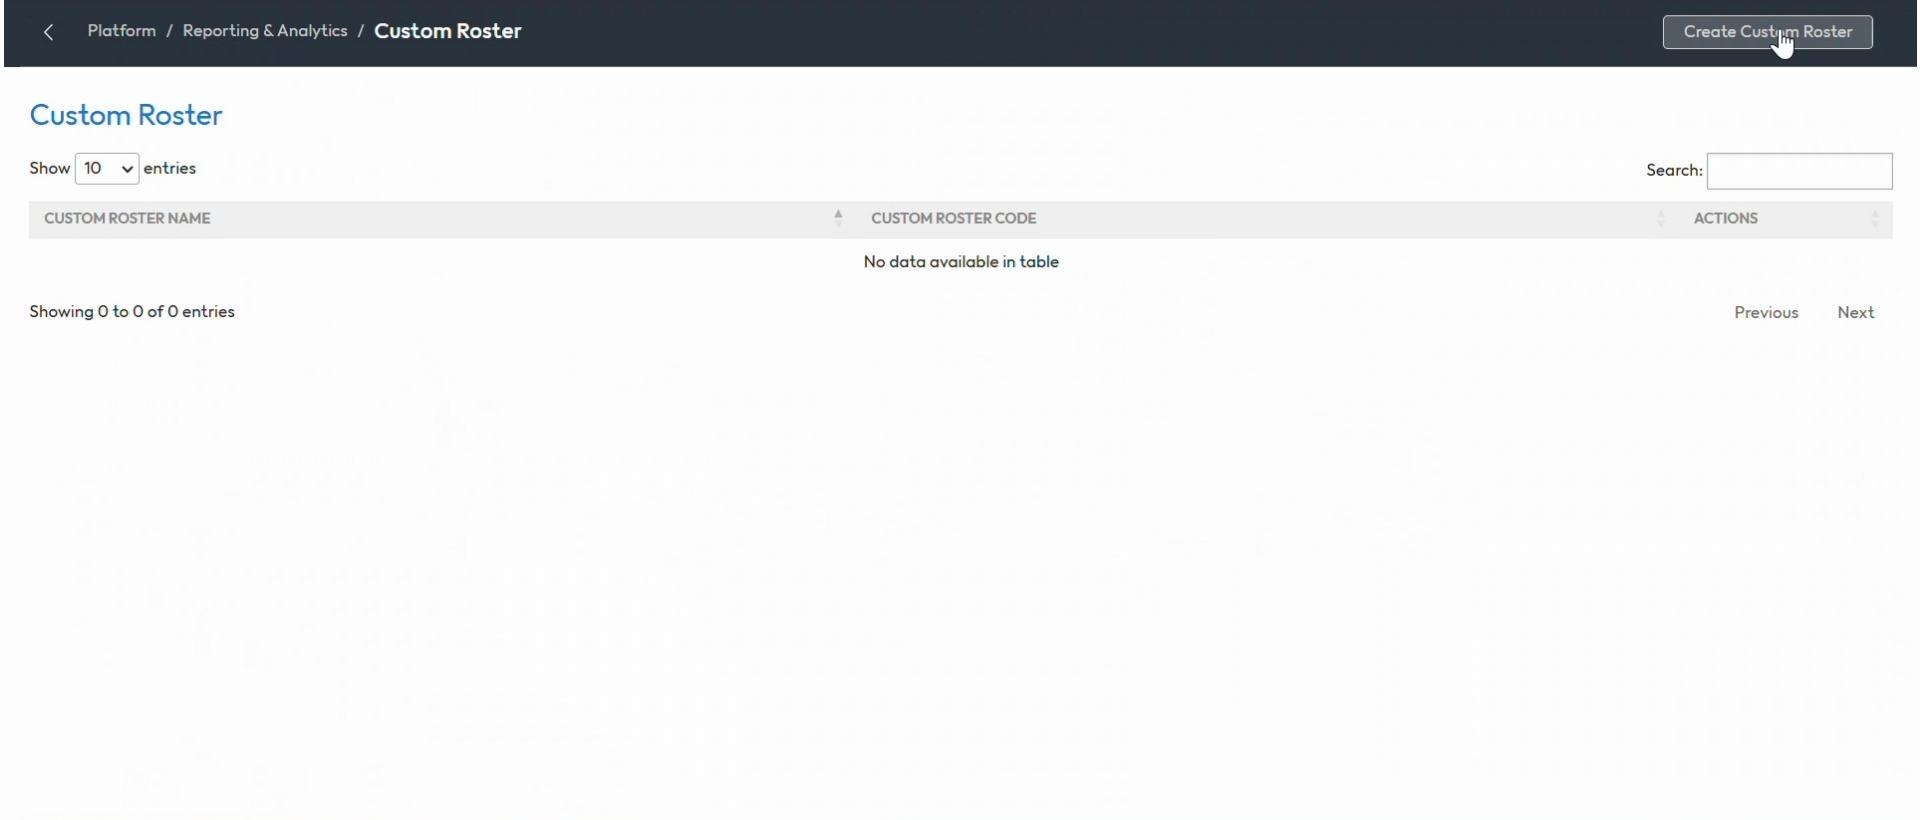
Figure 8 — The Custom Roster list page, reached via Platform › Reporting & Analytics › Custom Roster.
10. Creating a New Roster
Step 2: Click “Create Custom Roster” in the top-right corner of the list page.
A configuration form opens where you set up the roster's basic properties before choosing which data points to include.
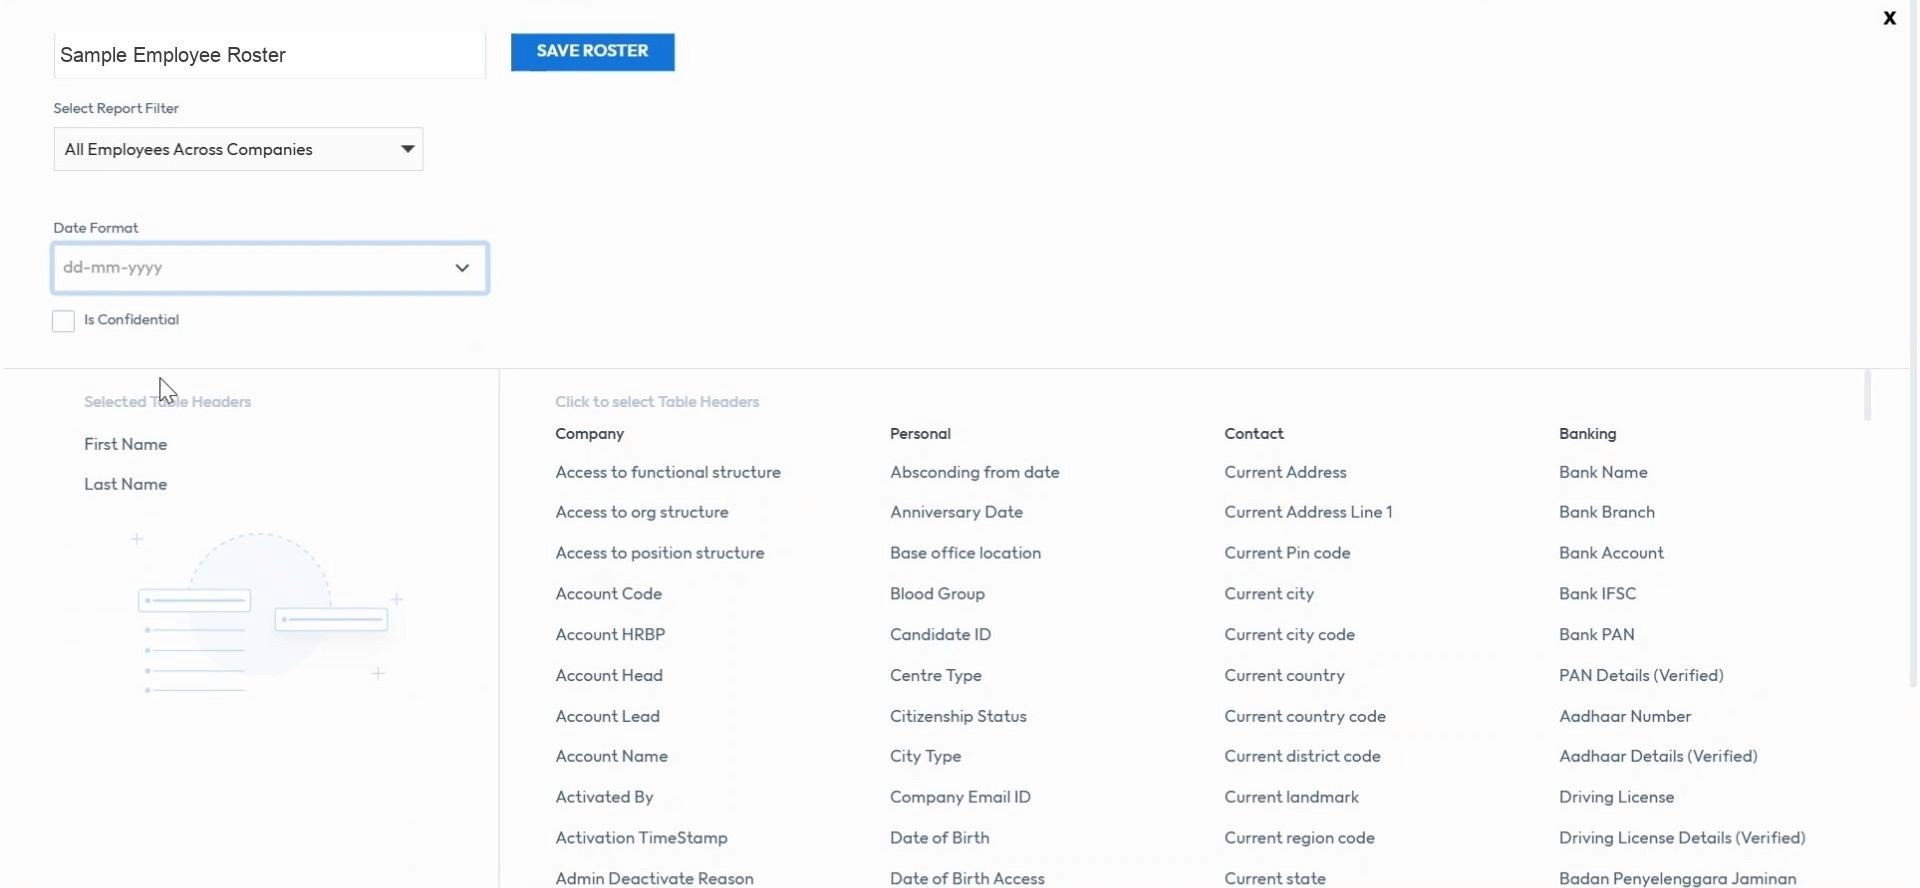
Figure 9 — The roster configuration form, with its basic settings and the two-panel field selector below.
Basic settings
Field | What it means |
|---|---|
Roster Name | A descriptive name for this report, e.g. “NPS Account Opening” or “Statutory Compliance Roster.” This is how it will appear in the roster list. |
Select Report Filter | Defines which group of employees the roster pulls data from — for example, all employees across companies, or a narrower, pre-defined filter. |
Date Format (should be dd-mmm-yyyy) | Controls how date-type fields (date of birth, date of joining, etc.) are displayed in the roster output. |
Is Confidential | Avoid to turn this “ON” as this may restrict some mandatory data to flow in the HRMS data pull. |
Step 3: Fill in the Roster Name, Report Filter, and Date Format (dd-mmm-yyyy) and mark the roster as confidential if it will contain sensitive data.
11. Adding Data Points to the Roster
Below the basic settings, the form shows two panels:
Selected Table Headers (left) — the data points that will appear as columns in the roster. First Name and Last Name are included by default.
Click to select Table Headers (right) — the full library of available data points, grouped under categories such as Company, Personal, Contact, and Banking.
Step 4: Find the data point you need. With hundreds of fields available, the fastest way to locate one is to use your browser's built-in search (Ctrl+F on Windows, Cmd+F on Mac), type part of the field name, and press Enter to jump to matches.
Step 5: Click the field name in the right-hand panel to add it to the Selected Table Headers list on the left.
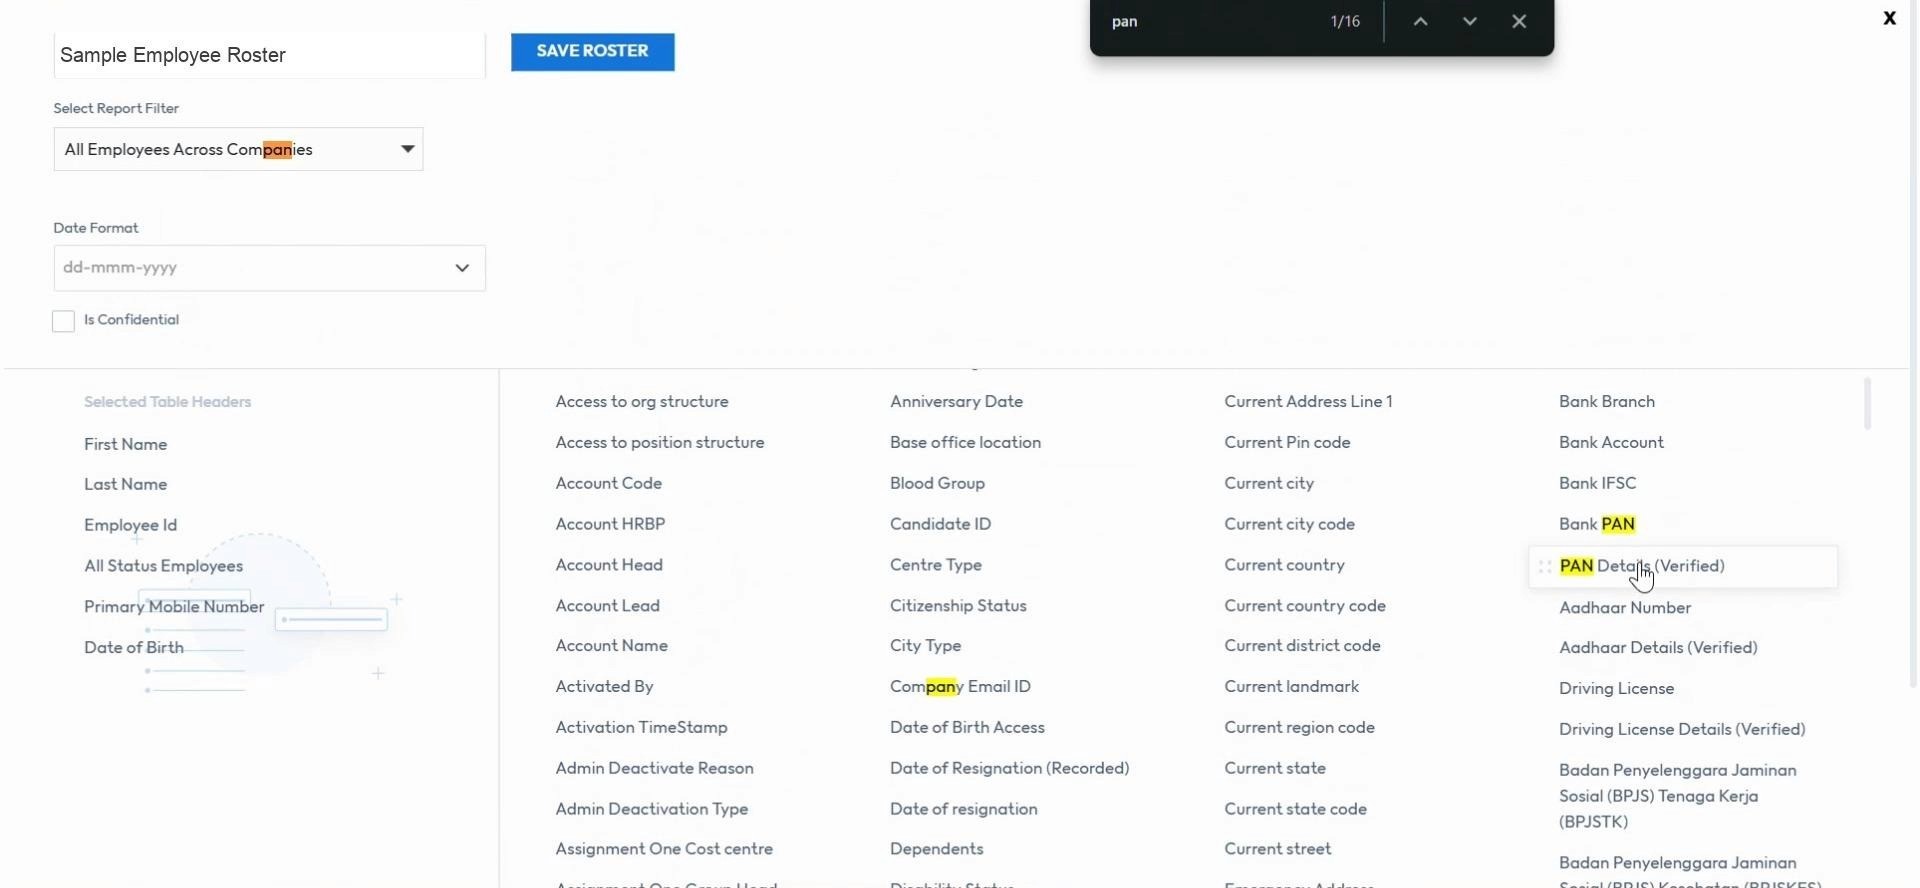
Figure 10 — Using Ctrl+F to search for “pan” and clicking “PAN Details (Verified)” to add it to the roster.
Step 6: Repeat for every data point you need — for example Employee ID, Date of Joining, Office Location, Bank Name, Bank Account, Bank IFSC, and so on. The Selected Table Headers list on the left grows with every field you add.
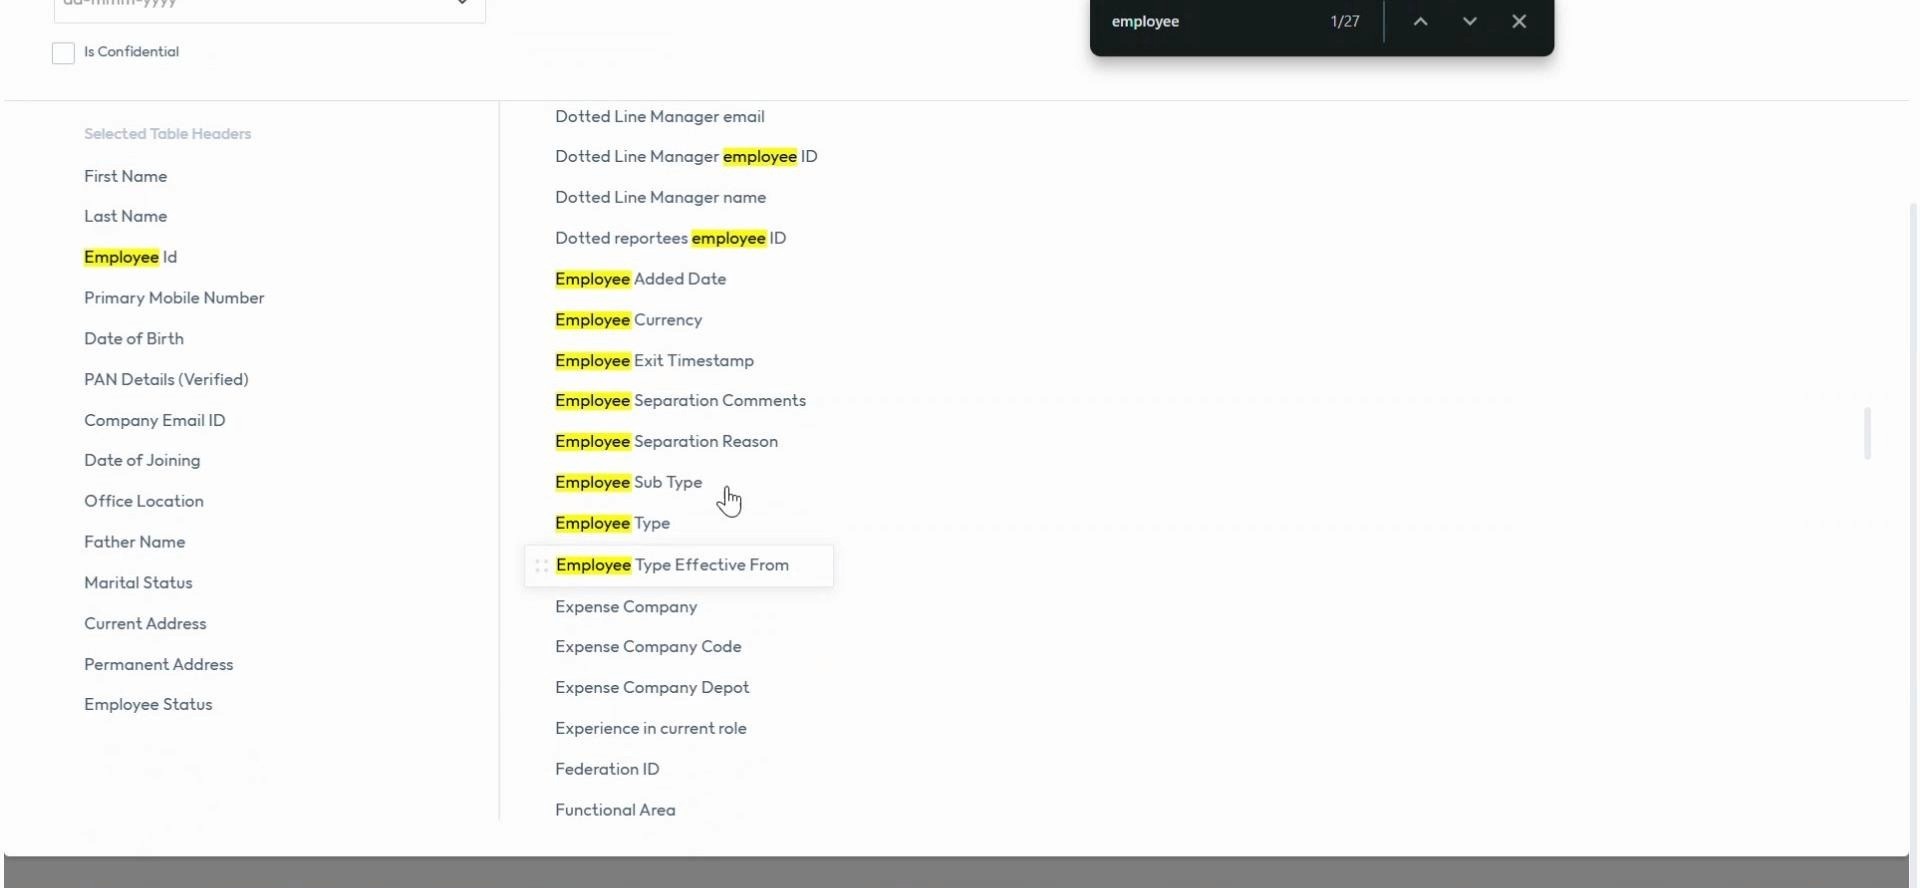
Figure 11 — The Selected Table Headers list after several data points have been added.
Tip Hover over an item in either panel to reveal a drag handle (::). You can drag entries in Selected Table Headers to reorder the columns exactly as you want them to appear in the roster. |
12. NPS Fields Activation
If the following NPS details are available for below mentioned fields in the HRMS, then please enable the same in the Custom Roster as well: NPS Status, PRAN Number, Employee Contribution %, Employer Contribution %, Employee Contribution Amount, Employer Contribution Amount
If these are not part of standard HRMS fields and are configured as custom fields already, then please share the Custom Field names with the HDFC Pension team.
If you want to get these added as custom fields, contact your Darwinbox support representative or raise a query through the Darwinbox Help Portal.
13. Saving the Roster
Step 7: Click “Save Roster” at the top of the form once you have added all the data points you need.
The roster is saved and returned to the Custom Roster list, now showing its name and an auto-generated roster code.
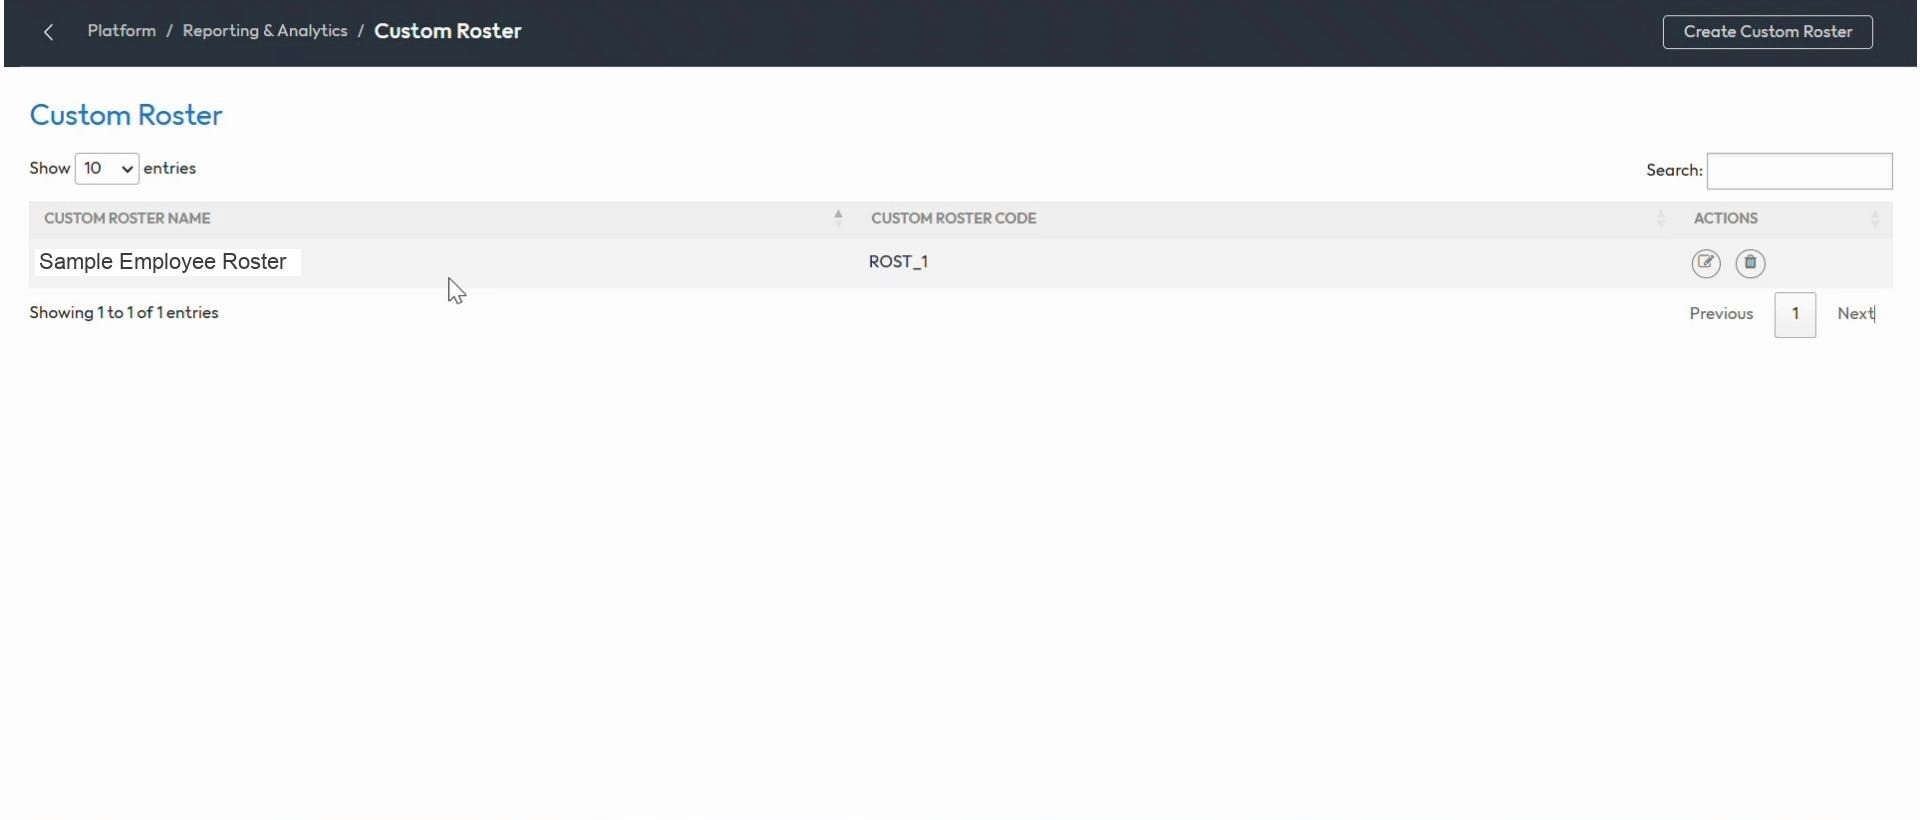
Figure 12 — The saved roster appearing in the Custom Roster list, with Edit and Delete actions.
Editing a roster later
You can add, remove, or reorder data points at any time: open the Custom Roster list, click the edit (pencil) icon next to the roster, and repeat the steps in Section 11. Use the delete (trash) icon to remove a roster you no longer need.
14. Tips & Best Practices
Use Ctrl+F / Cmd+F to search the field library instead of scrolling — with hundreds of data points, it is by far the fastest way to find what you need.
Keep roster names descriptive and specific to their purpose (e.g. “NPS Account Opening”) so they are easy to find later in the list.
If a data point you need does not exist in the standard field library, contact your Darwinbox support representative or raise a query through the Darwinbox Help Portal to have a custom field created.
15. Questions For HR
HRMS Details
- What is your HRMS name/platform?
- Is the current HRMS solution a standard (off-the-shelf) or custom-built implementation?
NPS (National Pension System) Setup
Do you have an NPS setup, or is NPS contribution data captured somewhere within the HRMS itself using custom fields?
- If yes — what is the NPS setup, and where is it placed within the HRMS? A step-by-step walkthrough would help.
- Where is the NPS status captured? Is it a standard field or custom field created in the HRMS?
- Where is the contribution captured — is it recorded as a percentage (%) or as a fixed amount both for employer and employee? Is it a standard field or custom field created in the HRMS?
- Where is the PRAN (Permanent Retirement Account Number) ID captured in the system? Is it a standard field or custom field created in the HRMS?
- If available, please share any related technical documentation for this setup.
End of guide.